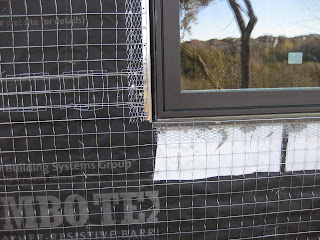
The house is now resplendent in shiny metal lath. Particular attention to detail is placed upon the windows. The custom metal pans above and below the window are now being caulked with care. The first photo shows the window before caulking, note the gap between window and wall.
Next, the window is taped for protection from errant caulk and a round flexible foam insert is installed in the gap.
This insert is critical because it creates an ingenuous bond. As the caulking is applied, the edges nearest the window and wall receive a deep layer of caulk, with the area on the insert relatively thin. This allows for a hard bond of the caulk to the window and wall, but also ensures that seasonal expansion and contraction stress the thinner, center section of caulk rather than pulling the edges loose from their contact points. Quite a bit of time and craftmanship are going into this seemingly minute detail. Here is the caulking over the foam insert. After the material is applied it is carefully shaped by hand.
And here is the finished product. I don't expect to see any water issues around my windows or doors.
Because we have freezing temps at night, this caulk will take several days to dry. We probably won't start the cement stucco application til Monday. Roof demo and new roof install probably coming next week though.
On an unexpected note, our well pump has died. I have learned a lot about wells and plumbing the last few days, but I think I will save it and the photos til I replumb the pump house. I also installed blocking in the walls of the house for toilet paper holders, towel racks, and taxidermy additions. This way we'll have solid anchors (not sheetrock) for those things that always seem to pull out of the wall. Here's an example:
I wrote the dimensions from the wall and floor on the studs and took lots of digital photos which I labeled. That way I can go back and check them after sheetrock is up when I need to install things. I also laid a tape measure on the floor and took detailed photos to record the distance of studs from various walls where I might hang things.
21 May 2010, closing day. We've just purchased a moldy, leaky 3 bedroom mess. This blog will chronicle our remodel efforts.
14 December 2010
10 December 2010
December Progress
Yesterday we passed our framing/plumbing inspection, so things are really kicking into high gear. First the stucco goes on, then the roof and insulation, then the sheetrock. Here's step one of the stucco application, the felt paper and metal lath.
Note the newly stained posts and ceiling in that last picture, here's another view below.

This past week Willie our trim carpenter put in stain grade trim around the windows for the 3/4" bullnose sheetrock returns. That doesn't mean much without a picture, but I'll wait til the sheetrock is installed for pictures. We ordered a 3 panel shaker style mahogany door and jamb, the 3 panels will be reeded glass. The jamb arrived today so we'll get that installed and the final window above it shortly. I added niches to the master shower which will be tiled. Also the fiberglass pan for the shower was installed. We decided to go with a frameless full length glass door for this shower.
Our cabinets are being made. We are using a combination of cherry, walnut, and paint grade wood for the various rooms. Mark the cabinet maker brought by wood samples today so Larry the painter can put sample colors on for final selection.


